


OS X Daily: “AT&T Will Unlock Out-of-Contract iPhones Starting April 8” plus 6 more |  |

- AT&T Will Unlock Out-of-Contract iPhones Starting April 8
- Disable Google Chrome Automatic Software Update
- 3 Ways to Make Phone Calls from the iPad or iPod touch
- Drag & Drop from Spotlight in Mac OS X
- How to Create a Tar GZip File from the Command Line
- Load Up Your iPad with a Massive Library of Over 38,000 Free eBooks
- How to Check for the Flashback Trojan in Mac OS X
| AT&T Will Unlock Out-of-Contract iPhones Starting April 8 Posted: 06 Apr 2012 11:38 AM PDT
iPhone owners who are out of contract with AT&T will be able to unlock their devices starting April 8. An unlock means the SIM card slot becomes usable outside of the AT&T network, allowing for an individual to swap SIM cards and gain service on another compatible carrier, like T-Mobile. This exciting news comes from America OnLine Engadget, who provides the following official statement from AT&T:
There are no instructions provided on how to unlock the iPhone, presumably a user will have to contact AT&T directly to walk through the unlock process with a representative. Typically this requires the IMEI number of the iPhone in question, which can be easily found on the iPhone itself or through iTunes. The phone number for AT&T wireless is 1-800-331-0500, and repeatedly pressing 0 is the easiest way to speak with a human being. Given the pent up demand for unlocked iPhones there will likely be a surge of interest in unlocking contract-free devices. Unlocking is extremely beneficial to users who travel abroad. Purchasing a local pay-go SIM card is significantly cheaper than roaming through AT&T’s overpriced international rates, and also makes an iPhone more useful in areas where AT&T coverage is limited or does not exist. Even those with no intention on using an iPhone abroad or with a competing cellular network should unlock their iPhone if given the chance. Individuals who bought an iPhone out of contract can also request the unlock, though their devices should already be unlocked by default.
|
| Disable Google Chrome Automatic Software Update Posted: 06 Apr 2012 11:13 AM PDT
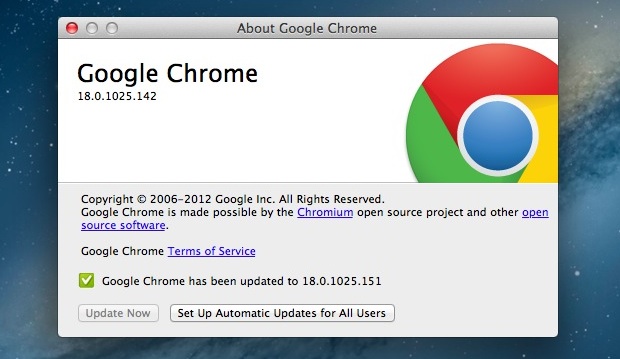
Google Chrome automatically updates itself in the background when a new version is out, this takes responsibility out of user hands and makes it simple to keep up to date with the latest version of the app. Generally you should leave automatic update enabled, if not for its ease than for the security benefits of having the freshest browser version pushed to you automatically, but if you want to disable the sizable automatic updates to reduce Personal Hotspot data use or something similar you can do so with a defaults write command. Disabling Google Chrome Automatic Updates
Note that this disables all automatic updates for all Google applications on the computer, not just for Chrome. There may be a way to disable Chromes automatic updating only but I haven’t found it, even Google offers the more broad solution outlined above. Manually Updating Chrome After Automatic Update is DisabledNow that you’ve disabled Chrome’s automatic updates, you’ll want to manually update. The easiest way would be to just download the latest version of Chrome from the website, but you can also initiate the update process from the command line by following the steps outlined below:
If you get tired of dealing with manual updates, it’s easy to turn back on again: Re-Enable Google Chrome Auto Updates
The number on the end is the number of seconds between version checking intervals, 18000 is the default setting but if you want to be more or less aggressive select a higher or lower number accordingly. As mentioned earlier, it’s generally recommended as a maintenance tip to leave automatic updates turned on for all applications, Chrome included.
|
| 3 Ways to Make Phone Calls from the iPad or iPod touch Posted: 06 Apr 2012 10:26 AM PDT
Want to use the iPad or iPod touch as a phone? You can do that. With Skype or Google Voice you can turn your standard wi-fi iPad into a VOIP phone, and you’ll be able to make and receive phone calls and text messages directly from the iPad or iPod. These apps are free to download and even free to make calls between other users of the services, but if you want to make outside phone calls or send text messages to real phones you’ll need to pay for some cheap credits. Before getting started, it is strongly recommended to use headphones when making calls from an iPad or iPod touch or else you will be stuck on speakerphone constantly, Apple earphones 3 Free Apps to Make Phone Calls from iPad or iPod touch
Which service to use ultimately depends on your preferences and your device, but in terms of call quality both Skype and Google Voice are great. Prices for call credits are also similar enough to not make much of a difference in consideration, so overall I’d recommend picking a service that matches your iOS hardware with a native client and where most of your contacts are.
|
| Drag & Drop from Spotlight in Mac OS X Posted: 06 Apr 2012 06:01 AM PDT
You can drag and drop files directly from Spotlight to elsewhere in the OS X Finder. To try it out, use Command+Space to search for something, then click and hold on the item while dragging it out of the Spotlight menu. Default behavior moves the file from it’s source location to the new destination, but if you hold own the Option key during the process you can make a copy of the file instead. To undo the location change, hit Command+Z. This can be much faster than digging around in the file system to locate a document or folder manually, especially with files buried far within subfolders. OS X Lion or later is required to use drag and drop in Spotlight.
|
| How to Create a Tar GZip File from the Command Line Posted: 05 Apr 2012 04:31 PM PDT
You’re probably familiar with making your own zip files if you’ve ever needed to transfer a group of files or if you’re managing your own backups outside of Time Machine. Using the GUI zip tools are easy and user friendly, but if you want some more advanced options with better compression you can turn to the command line to make a tar and gzip archive. The syntax will be the same in Mac OS X as it is in Linux. Creating a Tar GZip Archive BundleFrom the command line (/Applications/Terminal/), use the following syntax:
For example, to compress a directories jpg files only, you’d type:
The * is a wildcard here, meaning anything with a .jpg extension will be compressed into the jpegarchive.tar.gz file and nothing else. The resulting .tar.gz file is actually the product of two different things, tar basically just packages a group of files into a single file bundle but doesn’t offer compression on it’s own, thus to compress the tar you’ll want to add the highly effective gzip compression. You can run these as two separate commands if you really want to, but there isn’t much need because the tar command offers the -z flag which lets you automatically gzip the tar file. Opening .tar.gz ArchivesUnpacking the gz and tar files can be done with applications like Pacifist or Unarchiver (free), or by going back to the command line with:
Followed by:
Generally you should untar things into a directory, or the present working directory will be the destination which can get messy quick.
|
| Load Up Your iPad with a Massive Library of Over 38,000 Free eBooks Posted: 05 Apr 2012 01:11 PM PDT
The iPad is a great device to read on, and if your digital library is feeling a little bare then you’ve come to the right place. We’ve found some of the best places to get free ebooks, ready to be downloaded and opened with iBooks on your shiny new iPad (or iPhone, iPod, Kindle, Nook, or Android, for that matter).
Gutenberg is probably the best source online, but other sites offer free ebooks too:
If you download the books onto a Mac or PC, emailing them to an iPad or iPhone is generally the easiest way to transfer them over quickly without syncing. From there they can be directly imported into iBooks or the Kindle app. Know any other quality sources for free ebooks? Chime in the comments.
|
| How to Check for the Flashback Trojan in Mac OS X Posted: 05 Apr 2012 11:28 AM PDT
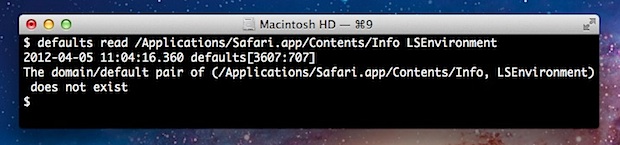
Trojans and viruses are generally something Mac users don’t have to worry about, but there’s a lot of hubub about the so-called Flashback trojan that has apparently infected a several hundred thousand Macs worldwide. The trojan takes advantage of a vulnerability in an older version of Java that allows it to download malware which then “modifies targeted webpages displayed in the web browser.” As we mentioned yesterday on Twitter, the vulnerability has already been patched by Apple and if you haven’t downloaded the latest version of Java for OS X yet you should do so now. Go to Software Update and install the Java for OS X Lion 2012-001 or Java for Mac OS X 10.6 Update 7, depending on your version of Mac OS. That will prevent future infections from occurring, but you’ll also want to review if a Mac is infected. We haven’t heard of or seen a single case of the Flashback infection on a Mac, but for the sake of optimal security we’re going to cover how to quickly check if a Mac is afflicted by Flashback trojan:
What if you see something different in the Terminal? If the defaults read commands show actual values, you may have the trojan though this does seem to be very rare. In the event you run into a Mac with the problem follow the guide on f-secure to remove the Flashback trojan, it’s just a matter of copying and pasting a few commands into the Terminal. All in all this is nothing to freak out about, but it does serve as another reminder as to why it’s important to update system software as part of a general maintenance routine.
|


 are great because they include a microphone, or even something like the
  , this also insures you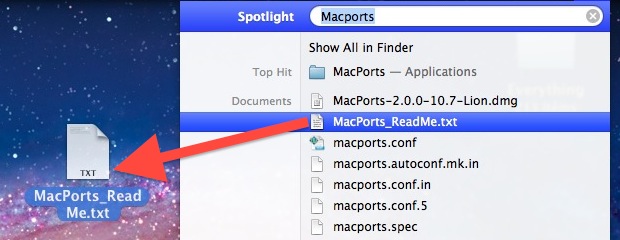


| You are subscribed to email updates from OS X Daily To stop receiving these emails, you may unsubscribe now. | Email delivery powered by Google |
| Google Inc., 20 West Kinzie, Chicago IL USA 60610 | |
0 comments:
Post a Comment